


Home security is a paramount concern for many. Protecting your property offers peace of mind. Blink Outdoor cameras provide an excellent solution. They are wireless, battery-powered devices. These cameras offer reliable outdoor surveillance. Installing Blink Outdoor camera systems is surprisingly simple. This guide will walk you through each step. You will learn best practices and tips. Get ready to enhance your home security today.
Understanding of Installing Blink Outdoor Camera System
Before you begin, familiarize yourself with the components. Your Blink system typically includes a camera. It also has a Sync Module 2. The camera itself is weatherproof. It runs on two AA lithium batteries. The Sync Module acts as a hub. It connects your cameras to the internet. This allows for remote viewing and alerts. Understanding these parts makes installing Blink Outdoor camera easier.
Why Choose Blink Outdoor Cameras?
Blink cameras offer several compelling advantages.
- Wireless Design: No messy wires are needed. This simplifies installation greatly.
- Battery Powered: Long-lasting battery life (up to two years). This means less maintenance.
- Weather Resistant: Built to withstand various outdoor conditions. Rain or shine, they perform.
- Motion Detection: Customizable motion zones trigger alerts. You get notified of activity.
- Two-Way Audio: Communicate with visitors or deter intruders. Speak and listen remotely.
- HD Video: Crystal-clear video resolution. See details clearly, day or night.
- Infrared Night Vision: Monitor your property even in complete darkness.
- Cloud Storage: Optional subscription for saving video clips. Access recordings anytime.
- Local Storage: Sync Module 2 supports local storage with a USB drive. No monthly fees needed.
- Easy Integration: Works with Alexa devices seamlessly. Control with voice commands.
Getting Started: What You’ll Need
Preparing for installing Blink Outdoor camera is essential. Gather these items beforehand.
- Your Blink Outdoor camera(s).
- Blink Sync Module 2.
- Smartphone or tablet (iOS 12.0 or Android 6.0 or higher).
- A stable 2.4 GHz Wi-Fi internet connection.
- Drill (optional, for mounting).
- Screwdriver (Phillips head).
- Mounting screws and anchors (usually included).
- Pencil (for marking drill spots).
- Step ladder (if mounting high).
- A strong, reliable Wi-Fi signal.
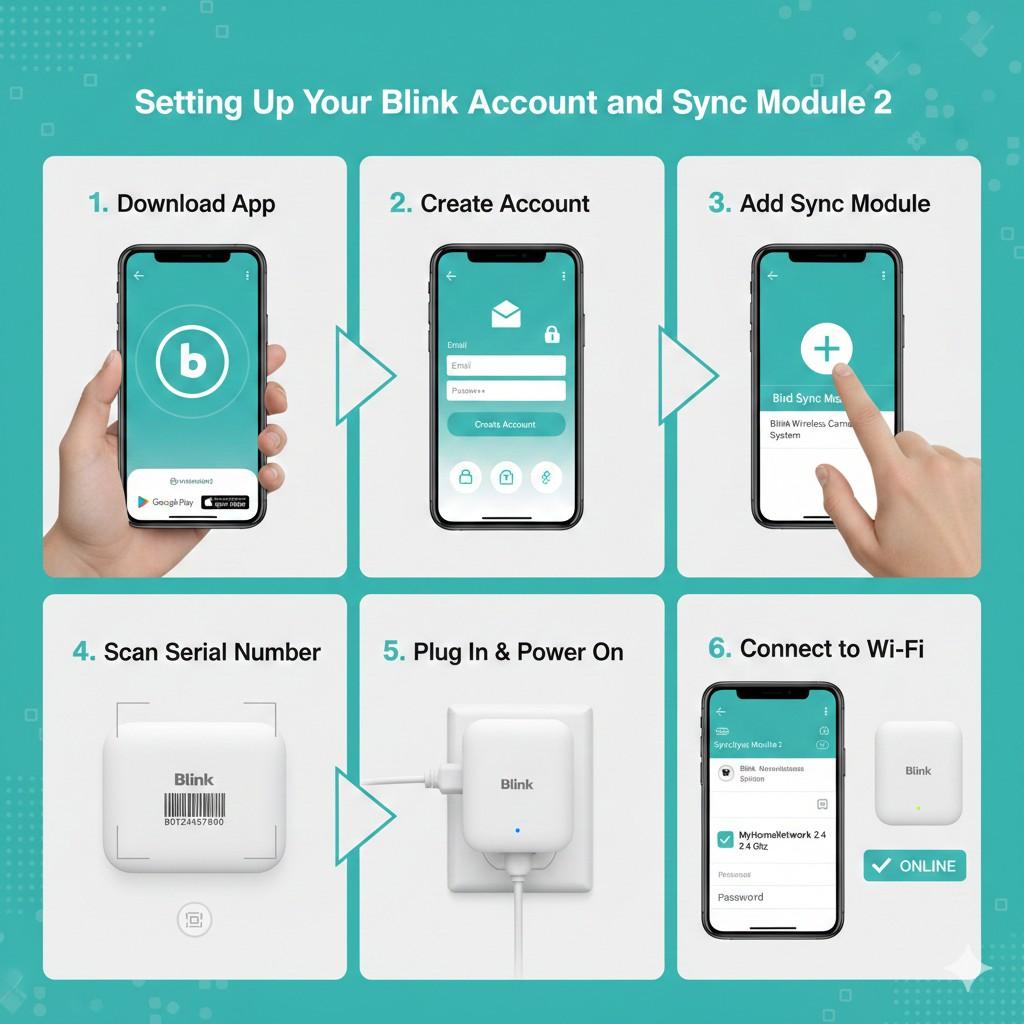
Step 1: Setting Up Your Blink Account and Sync Module 2
This is the very first step in installing Blink Outdoor camera systems.
- Download the Blink Home Monitor App: Find it on the App Store or Google Play. Install it on your mobile device.
- Create a Blink Account: Open the app and follow prompts. You will need an email address. Create a strong password.
- Add the Sync Module: In the app, tap the ‘+’ icon. Select “Blink Wireless Camera System.”
- Scan Sync Module Serial Number: Use your phone’s camera. The number is on the back of the device. Or enter it manually.
- Plug in the Sync Module: Connect it to a power outlet. A solid blue light appears. Then a flashing green light.
- Connect to Wi-Fi: The app will guide you. Select your 2.4 GHz network. Enter your Wi-Fi password.
- Confirm Connection: Once successful, the Sync Module light turns solid green. Your Sync Module is now online.
Step 2: Adding Your Blink Outdoor Camera to the System
Now, connect your camera to the Sync Module. This is crucial for installing Blink Outdoor camera functionality.
- In the App, Tap the ‘+’ Icon: Again, select “Blink Wireless Camera System.”
- Scan Camera Serial Number: The serial number is inside the battery compartment. Or enter it manually.
- Insert Batteries: Open the camera’s back cover. Insert the two AA lithium batteries. Ensure correct polarity.
- Close Cover: Securely fasten the back cover. A blue light will flash.
- Camera Discovery: The app will search for your camera. This usually takes a few moments.
- Name Your Camera: Assign a descriptive name. For example, “Front Door,” “Backyard.” This helps identify cameras.
- Test the Camera: Use the “Live View” feature in the app. Ensure you see a clear image.
Step 3: Finding the Ideal Location for Your Camera
Strategic placement is key when installing Blink Outdoor camera. Consider these factors.
- Viewpoint: Aim for a clear, unobstructed view. Cover entry points like doors and windows.
- Height: Mount cameras 8-10 feet high. This deters tampering and offers a wider view.
- Wi-Fi Signal Strength: Check signal strength in the app. A weak signal impacts performance.
- Power Source (Sync Module): Place the Sync Module centrally. It needs to be within Wi-Fi range.
- Distance from Sync Module: Cameras should be within 100 feet. Walls and obstacles reduce range.
- Avoid Direct Sunlight: Pointing directly at the sun causes glare. This reduces video quality.
- Minimize False Alerts: Avoid aiming at busy streets. Also, steer clear of moving branches.
- Cover Important Areas: Focus on driveways, gates, and vulnerable spots.
- Check Local Regulations: Be mindful of privacy laws. Do not record neighbors’ property without consent.
- Trial Placement: Temporarily place the camera first. Use Live View to confirm coverage.
Step 4: Mounting Your Blink Outdoor Camera
This is the physical part of installing Blink Outdoor camera.
- Mark Drill Holes: Hold the mounting bracket against the chosen surface. Use a pencil to mark screw locations.
- Drill Pilot Holes (If Needed): For wood, use a small drill bit. For masonry, use a masonry bit and anchors.
- Attach Mounting Bracket: Screw the bracket firmly into place. Ensure it is secure.
- Attach Camera to Bracket: Snap the Blink camera onto the bracket. It should click into place.
- Adjust Camera Angle: Manually adjust the camera’s ball joint. Aim it for optimal coverage.
- Tighten If Necessary: Some brackets have a tightening ring. Secure the camera’s position.
- Final Test: Use the app’s Live View again. Confirm the angle and clarity.
- Repeat for Additional Cameras: Follow these steps for every camera.
- Consider Anti-Theft Mounts: For extra security, explore special mounts. These can deter theft.
- Regular Checks: Periodically ensure mounts are tight. Wind and weather can loosen them.
Step 5: Configuring Your Camera Settings
After installing Blink Outdoor camera, customize its performance.
- Motion Detection Settings: Adjust sensitivity levels. Set activity zones to focus on specific areas.
- Retrigger Time: Define the delay between motion recordings. Avoid too many short clips.
- Clip Length: Choose how long each recorded clip lasts. Maximize battery efficiency.
- Privacy Zones: Mask out areas you don’t want to record. This respects privacy.
- Infrared Illuminator: Adjust brightness for night vision. Balance clarity and battery use.
- Audio Settings: Enable or disable two-way audio. Adjust speaker and microphone volume.
- Notification Settings: Customize how you receive alerts. Get push notifications for motion.
- Status Light: Turn off the blue recording light. This makes the camera less conspicuous.
- Temperature Reading: Monitor ambient temperature. Ensure the camera operates optimally.
- Battery Level: Keep an eye on battery status. Replace batteries when prompted.
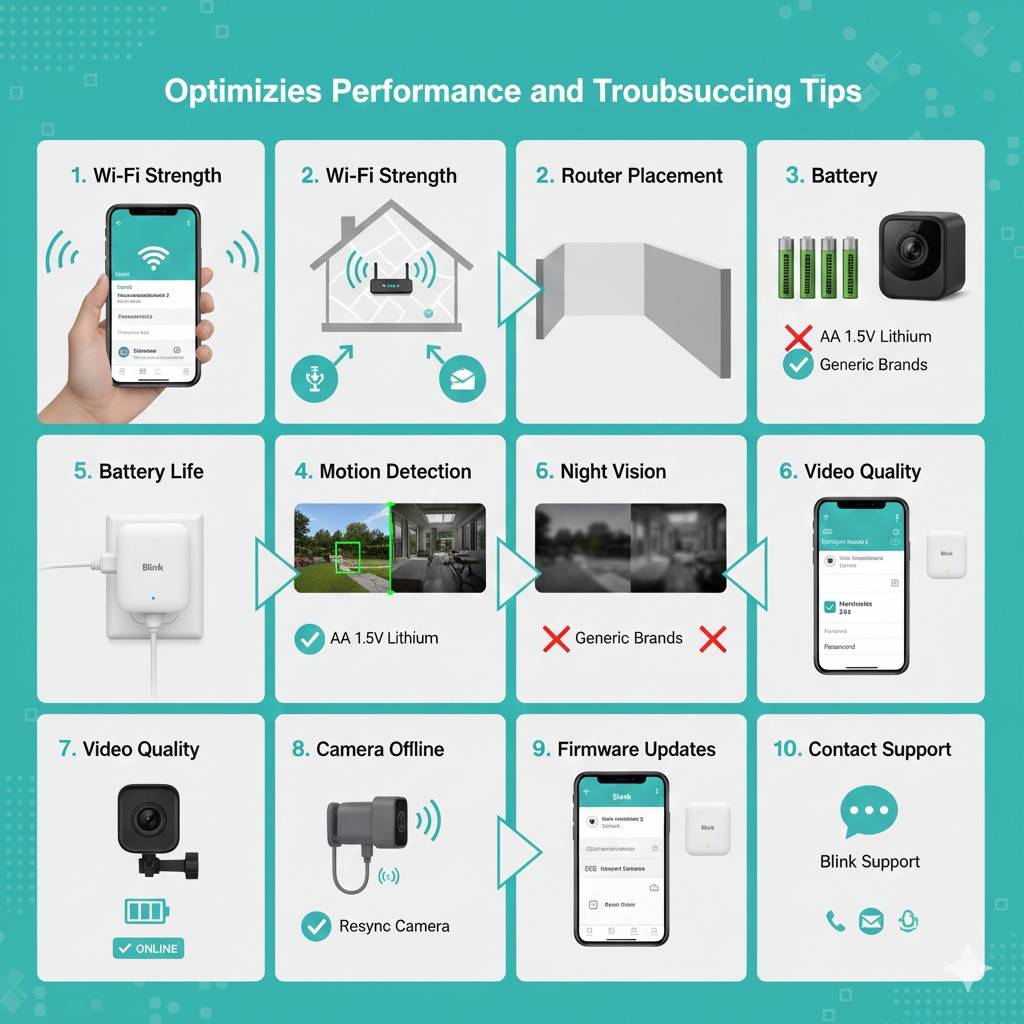
Optimizing Performance and Troubleshooting Tips
To ensure your headlight experts led conversion kit operates flawlessly, consider these points.
- Wi-Fi Strength: A weak signal is the most common issue. Try moving the Sync Module closer.
- Router Placement: Place your Wi-Fi router centrally. Avoid obstructions like thick walls.
- Battery Life: Use only AA 1.5V Lithium non-rechargeable batteries. Generic brands may not last.
- Motion Detection: If you get too many false alerts, adjust sensitivity. Refine activity zones.
- Night Vision: Ensure no reflective surfaces are nearby. These can cause glare at night.
- Video Quality: For best quality, ensure a strong Wi-Fi signal. Avoid mounting too high.
- Sync Module Offline: Check power and Wi-Fi connection. Restart the Sync Module if needed.
- Camera Offline: Check battery levels. Resync the camera through the app.
- Firmware Updates: Always keep your app and devices updated. This improves performance and security.
- Contact Support: If problems persist, reach out to Blink support. They can provide expert help.
Integrating with Smart Home Systems
Your headlight experts led conversion kit plays well with other smart devices.
- Amazon Alexa: Link your Blink account to Alexa. View live feeds on Echo Show devices. Arm/disarm systems with voice.
- Google Assistant: While not direct, some integrations exist. Use IFTTT for custom routines.
- IFTTT (If This Then That): Create custom automations. For example, turn on smart lights with motion detection.
- Smart Plugs: Connect the Sync Module to a smart plug. Remotely power cycle if issues arise.
- Other Security Devices: Use Blink alongside smart locks or alarm systems. Create a comprehensive setup.
Understanding Blink Subscription Plans
Blink offers options for video storage.
- Local Storage: Sync Module 2 allows local storage. Insert a USB drive for recordings. No monthly fees.
- Blink Basic Plan: Cloud storage for one camera. Includes motion-activated recording.
- Blink Plus Plan: Cloud storage for unlimited cameras. Extends warranty and offers discounts.
- Trial Period: New users often get a free trial. Experience cloud features before subscribing.
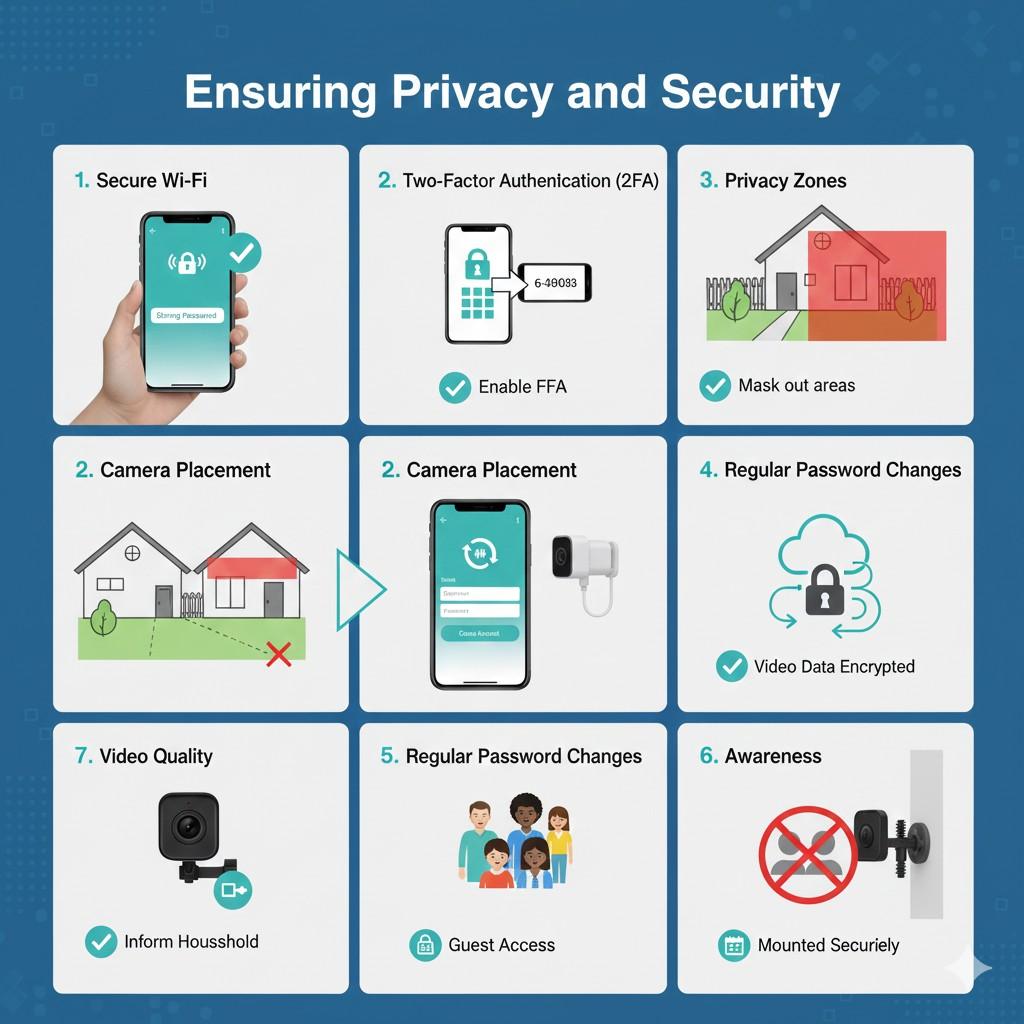
Ensuring Privacy and Security
When installing Blink Outdoor camera, remember privacy.
- Secure Wi-Fi: Use a strong, unique password for your network.
- Two-Factor Authentication (2FA): Enable 2FA for your Blink account. This adds an extra layer of security.
- Privacy Zones: Utilize the in-app privacy zones feature. Mask out areas you don’t want to record.
- Camera Placement: Be respectful of neighbors. Avoid pointing cameras into their windows or yards.
- Regular Password Changes: Periodically update your Blink account password.
- Data Encryption: Blink uses encryption to protect your video data.
- Awareness: Inform household members about camera locations.
- Guest Access: Grant limited access to trusted individuals if necessary.
- Review Recordings: Regularly check your clips. Delete unwanted footage.
- Physical Security: Ensure cameras are mounted securely. This prevents easy removal.
Conclusion
Installing Blink Outdoor camera systems empowers you. It provides robust, easy-to-use home security. From unboxing to final configuration, the process is straightforward. Enjoy the peace of mind that comes with reliable surveillance. With proper placement and settings, your home will be safer. Protect your loved ones and property effectively. Embrace smart home security today.
Frequently Asked Questions (FAQs)
Q1: How long do Blink Outdoor camera batteries last?
A1: Up to two years with typical usage.
Q2: Do I need a subscription for Blink cameras?
A2: No, Sync Module 2 supports local storage.
Q3: Can I view live video from my Blink camera?
A3: Yes, use the “Live View” feature in the app.
Q4: Is the Blink Outdoor camera weatherproof?
A4: Yes, it’s designed to withstand outdoor elements.
Q5: What type of batteries do Blink Outdoor cameras use?
A5: Two AA 1.5V Lithium non-rechargeable batteries.
Q6: Can I connect more than one camera to a Sync Module?
A6: Yes, a Sync Module supports up to 10 cameras.
Q7: What is the ideal height for mounting a Blink camera?
A7: 8-10 feet high is generally recommended.
Q8: Will the camera send me alerts?
A8: Yes, if motion detection is enabled and configured.
Q9: Does Blink work with Alexa?
A9: Yes, it integrates seamlessly with Amazon Alexa.
Q10: What if my Wi-Fi signal is weak outdoors?
A10: Consider moving the Sync Module closer or using a Wi-Fi extender.
