
Introduction: Discovering Wireless Comfort
The Fulext headband offers a unique audio experience. It cleverly combines a comfortable fabric band with integrated thin speakers. This design is perfect for sleeping, exercising, or just relaxing. Naturally, the first step is achieving a successful fulext headband pairing. This simple guide will help you connect your device quickly. Therefore, you can start enjoying your favorite audio content right away.
Getting Started: Preparing for Fulext Headband Pairing
Preparation is key for a seamless connection. First, fully charge your Fulext headband. Generally, a full charge takes about two to two and a half hours. A low battery can sometimes interfere with the fulext headbands pairing process. Next, keep the headband close to your audio device. This ensures a strong signal during the initial setup. Finally, make sure Bluetooth is turned on for your phone or tablet.
- Charge Fully: Ensure maximum power for best results.
- Stay Close: Keep the headband within three feet of your device.
- Enable Bluetooth: Activate Bluetooth on your phone or tablet.
The Core Process: Step-by-Step Fulext Headband Pairing
Achieving the fulext headbands pairing is a straightforward procedure. You will need to put the headband into its discoverable mode. Following this, you will locate and select it on your audio device.
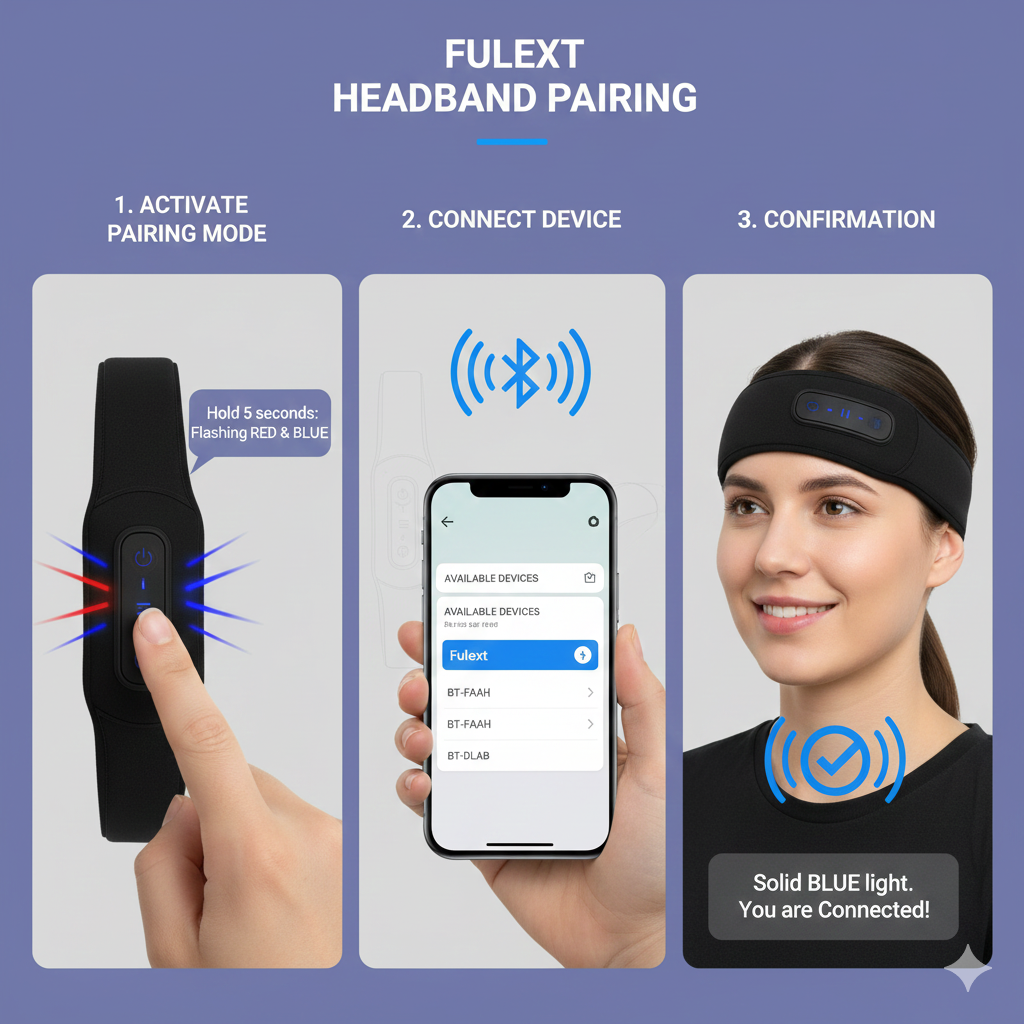
1. Activating Pairing Mode on the Headband
Locate the control panel on your Fulext headband. You will find a power/play/pause button there. Press and hold this central button for about three to five seconds. The indicator light will begin to flash rapidly. Usually, this light alternates between red and blue colors. This flashing signals that the device is now in fulext headbands pairing mode. It is actively searching for a connection.
2. Connecting from Your Audio Device
Now, navigate to the Bluetooth settings menu on your phone or tablet. The device will automatically scan for new connections. Look for a name like “Fulext,” “BT-FAAH,” or “BT-DLAB.” The exact name can vary depending on your specific model. Once you see the correct name, tap it to initiate the fulext headband pairing. Your device might ask you to confirm the pairing.
3. Confirmation of Successful Fulext Headband Pairing
The rapid flashing light will typically stop after a successful connection. Consequently, the light may turn solid blue or disappear completely. You might also hear an audible tone or confirmation voice. This confirms the fulext headbands pairing is complete. You are now ready to enjoy wireless audio. The headband will then automatically connect to this paired device in the future.
Troubleshooting: Solving Fulext Headband Pairing Issues
Occasionally, you may encounter difficulty with fulext headbands pairing. Do not worry, as most issues are easy to fix. We will explore common problems and simple solutions. Furthermore, always ensure the headband is fully charged.
If Pairing Fails to Initiate
First, check that your headband is truly in pairing mode. Remember, the indicator light should be blinking quickly. If it is not, press and hold the power button again. Next, try turning your phone’s Bluetooth off and back on. This simple reset can resolve temporary connection glitches. Another step is moving closer to the headband. Physical distance can sometimes prevent a successful fulext headbands pairing.
Dealing with Previously Paired Devices
The Fulext headband only supports one active connection. Therefore, if you cannot perform the fulext headband pairing, a previous device may be connected. Turn off Bluetooth on any device the headband was previously linked to. If that does not work, go to your device’s Bluetooth list. You should select the Fulext device and choose “Forget This Device” or “Unpair.” Afterward, repeat the fulext headbands pairing steps from the beginning.
When the Headband Name is Not Visible
Sometimes the headband does not appear in the available device list. To address this, restart both the headband and your phone. Power the headband off and then on again. Then, re-enter the fulext headbands pairing mode. If the issue persists, interference might be the cause. Move away from Wi-Fi routers or other strong wireless signals. This could significantly improve the chances of a successful fulext headband pairing.
Beyond Pairing: Maximizing Your Fulext Experience
Once you have completed the fulext headbands pairing, you can explore its full potential. The control panel allows you to manage audio playback and calls.
- Play/Pause: Press the center button once to control audio.
- Volume Adjustment: Use the plus (+) and minus (-) buttons for volume control.
- Track Skipping: A quick press on the plus/minus button changes songs.
Furthermore, remember to remove the internal electronics before washing the fabric band. This maintains the device’s longevity. This simple care step is vital after your initial fulext headbands pairing.
Fulext Headband Pairing for Different Activities
The versatility of the Fulext headband is a major advantage. Successfully completing the fulext headbands pairing unlocks multiple use cases.
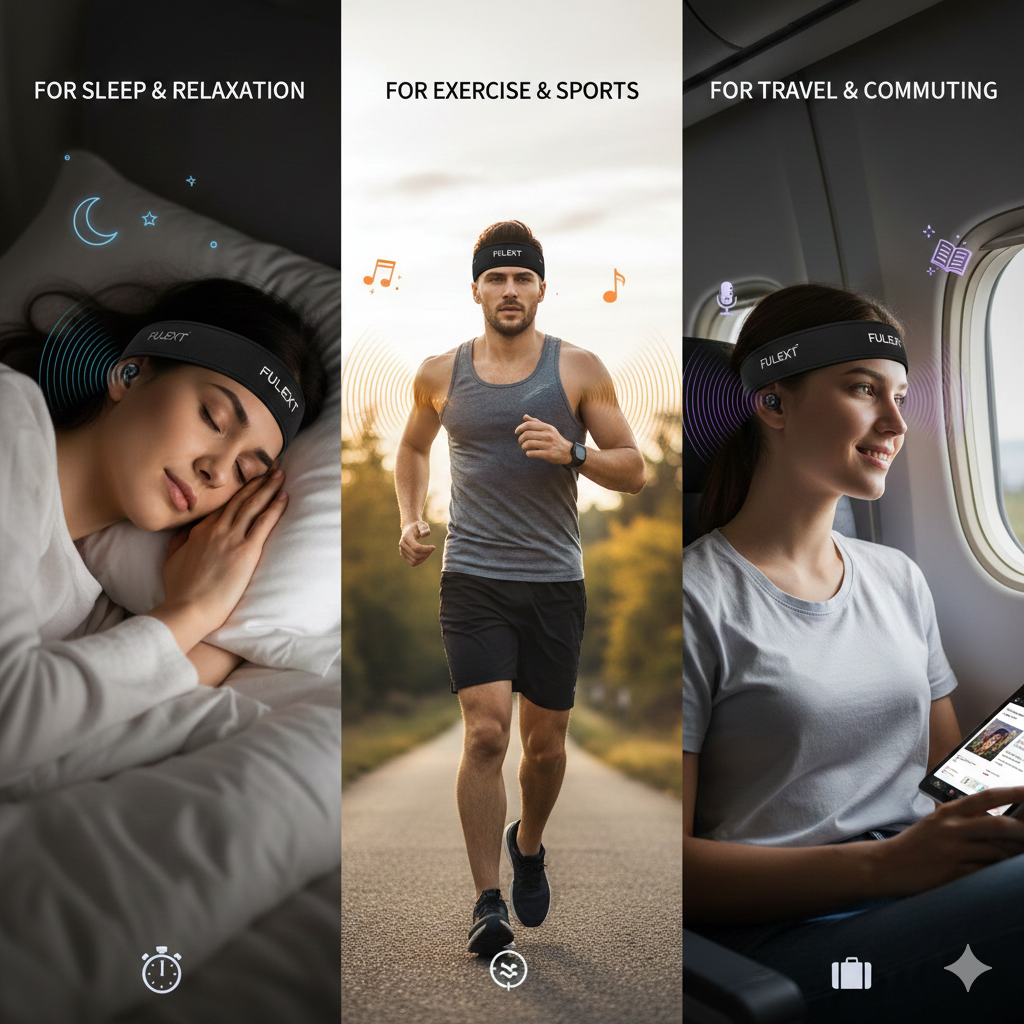
For Sleep and Relaxation
Many users employ the headband for sleep. The comfortable, ultra-thin speakers are ideal for side sleepers. After the fulext headband pairing, play soothing white noise or guided meditations. This helps block out disruptive household sounds. Consequently, you can achieve a deeper, more restful sleep cycle.
For Exercise and Sports
The headband also functions well as a sports accessory. It keeps sweat out of your eyes during workouts. Therefore, you can enjoy music without dealing with irritating earbud adjustments. Perform the fulext headbands pairing before starting your run or yoga session. The stable Bluetooth connection will keep the music flowing seamlessly.
For Travel and Commuting
Traveling often involves unwanted noise. The headband helps create a personal, quiet space. Completing the fulext headband pairing lets you listen to podcasts or audiobooks. This makes long flights or commutes much more enjoyable. The compact design is also easy to pack and transport. The continuous connection post fulext headbands pairing is a significant travel benefit.
Advanced Considerations for Fulext Headband Pairing
You might want to connect to a new device entirely. In this case, you must disconnect from the previous one. The easiest method is turning off Bluetooth on the original device. This prepares the headband for a new fulext headbands pairing. Always confirm the disconnection before attempting a new link.
Checking for Firmware Updates
Sometimes, an outdated firmware can affect connectivity. Always check the manufacturer’s website for any available updates. While less common for headbands, it can improve your overall connection stability. Keeping the software current ensures the smoothest possible fulext headbands pairing.
Battery Life and Fulext Headband Pairing
Optimal performance includes a strong battery life. The headband generally provides up to 10-12 hours of playtime. A low battery may lead to intermittent disconnection or prevent a new fulext headbands pairing. Therefore, fully charge the device regularly for best results.
Seamless Sync: Mastering Fullex Headband Pairing
The Fullex headband pairing process is designed for effortless connection, letting you jump into your audio quickly. To sync your device, start by ensuring the headband is fully charged. Next, press and hold the power button until the indicator light begins flashing rapidly—this signifies it’s in pairing mode. On your smartphone or tablet, navigate to the Bluetooth settings and search for new devices. Select the one named “Fullex” from the list. Once connected, the light will typically stop flashing or change color, confirming a successful Fullex headband pairing. Enjoy superior sound quality and comfort without the wires!
Conclusion: Achieving Perfect Fulext Headband Pairing
Successfully completing the fulext headbands pairing is your gateway to wireless audio freedom. Remember the simple steps: charge, enter pairing mode, and connect. With these instructions, you can minimize frustration and maximize enjoyment. The seamless fulext headbands pairing process makes this an excellent audio accessory. Enjoy the comfort and high-quality sound of your Fulext headband today.
❓ Frequently Asked Questions (FAQs) about Fulext Headband Pairing
How do I initiate the Fulext headband pairing process?
You must press and hold the power button for about five seconds. The indicator light will flash red and blue. This indicates the fulext headband pairing mode is now active.
Why is the Fulext headband name not appearing on my phone?
First, ensure your phone’s Bluetooth is on and the headband is fully charged. Next, try turning Bluetooth off and on again. Also, verify that no other device is currently connected to the headband.
Can I connect my Fulext headband to two devices at once?
No, the Fulext headband generally supports only one Bluetooth connection at a time. You must disconnect from the previous device before a new fulext headband pairing.
What does the flashing red and blue light mean during pairing?
The alternating red and blue light signifies that the headband is in fulext headbands pairing mode. It is actively ready to be discovered and connected by a host device.
How do I know if the Fulext headband pairing was successful?
The flashing red and blue light will stop blinking. The light may become solid or turn off. You might also hear an audible confirmation tone through the speakers.
What should I do if my Fulext headband won’t pair after working fine before?
Try deleting or “forgetting” the headband from your device’s Bluetooth list. Then, restart both devices and repeat the standard fulext headband pairing procedure.
Is there a specific name I should look for during the Fulext headband pairing?
Look for names like “Fulext,” “BT-FAAH,” or “BT-DLAB” in your device’s available Bluetooth list. The exact name can differ based on the model.