

Introduction
Home security matters more than ever.
Installing a Blink Outdoor Camera is a smart move.
This guide shows how to install the Blink Outdoor Camera easily.
You don’t need any technical background.
Follow each step for a smooth setup process.
What is a Blink Outdoor Camera?
Blink Outdoor Camera is a wireless security camera.
It is designed for outdoor use.
It runs on batteries and connects via Wi-Fi.
You can monitor your home from anywhere.
The camera is weather-resistant and easy to install.
What You Need Before Installation
Before starting, gather these items:
- Blink Outdoor Camera
- Sync Module (included with most kits)
- Two AA lithium batteries
- A smartphone or tablet
- Wi-Fi connection
- A stable internet signal
Also, can gather knowledge about how to install the Blink outdoor camera from the App Store or Google Play.
Step 1: Unbox and Check the Components
Open the Blink Outdoor Camera box carefully.
Make sure all components are included.
You should find:
- Camera(s)
- Sync Module
- Mounting kit
- Batteries
- USB power cable
- Power adapter
- User manual
If anything is missing, contact customer support for how to install the blink outdoor camera.
Step 2: Insert the Batteries
Turn the camera to its back.
Use a small screwdriver or coin to open the battery compartment.
Insert the two lithium AA batteries.
Make sure to match the positive and negative ends.
Close the compartment securely.
Now, your camera is powered and ready for setup.
Step 3: Set Up the Sync Module
The Sync Module connects all Blink devices.
Plug the USB power cord into the module.
Connect the adapter to a wall outlet.
The LED on the module should start blinking blue.
Next, open the Blink app on your device.
Step 4: Add the Sync Module to the App
Open the Blink app and sign in.
Tap the plus icon (+) to add a device.
Select “Sync Module” from the list.
Scan the QR code on the module’s back.
Now follow the on-screen instructions.
Connect the Sync Module to your Wi-Fi.
Choose your network and enter the password.
When connected, the LED will turn solid blue and green.
Step 5: Add the Camera to the App
In the app, tap the plus icon again.
This time, choose “Blink Wireless Camera.”
Scan the QR code inside the camera.
Follow the instructions to link it to the Sync Module.
Name your camera (e.g., “Backyard Camera”).
Now your camera is connected to the app.
Step 6: Test the Camera
Place the camera near the Wi-Fi router.
Check the video feed from the app.
Ensure the camera is working properly.
Walk in front of it to test motion detection.
Adjust the app sensitivity if needed.
Step 7: Choose the Best Location for how to install the blink outdoor camera
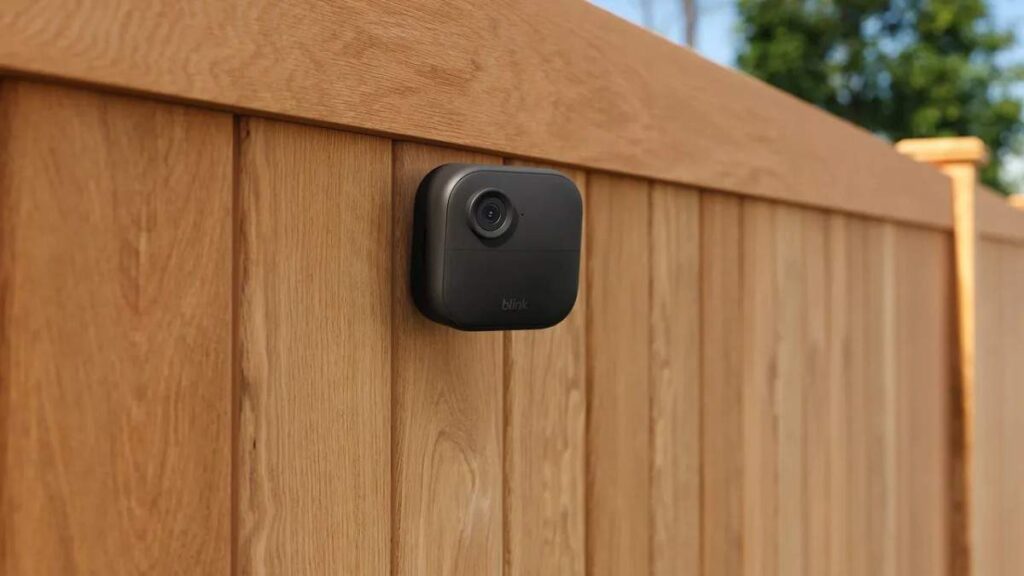
Pick a spot with a clear view.
Mount the camera 6 to 10 feet above the ground.
Avoid pointing directly at the sun.
Choose a location close to Wi-Fi range.
Keep it within the sync Module’s 100-foot range (approx.).
Step 8: Mount the Camera
Use the included mounting bracket.
Mark the screw holes with a pencil.
Drill holes and insert wall anchors (if needed).
Screw the mount into place.
Attach the camera to the mount.
Adjust the angle to cover the desired area.
Tighten the mount so the camera stays in position.
Step 9: Customize Settings in the App
Open the app and select the camera.
Set motion detection zones.
Adjust video quality settings.
Choose clip length and recording time.
Enable or disable audio recording.
You can also schedule when the camera records.
Step 10: Test Everything Again
Walk past the camera to trigger motion.
Check the alerts on your phone.
Ensure the angle captures everything needed.
Listen to recorded clips for audio quality.
Make any final adjustments in the app.
Tips for Better Performance
- Keep the camera out of direct rain.
- Check battery level monthly in the app.
- Use lithium batteries only.
- Avoid placing it near metal objects.
- Keep the firmware updated.
These tips ensure long-term use and better security.

Common Troubleshooting Tips for how to install the blink outdoor camera
Camera not connecting?
Move it closer to the Sync Module.
Video not clear?
Clean the lens and adjust the resolution.
No motion alerts?
Increase sensitivity or change detection zones.
Low battery warning?
Replace with new AA lithium batteries only.
Check the app’s support section for more help.
Blink Subscription Plan (Optional)
Blink offers cloud storage for videos.
You can review clips anytime via the app.
Without a plan, live view is limited.
Subscription plans start at a low monthly cost.
You can manage plans from your Blink app.
How to Remove or Reset the Camera
To remove, go to the app’s settings.
Select the camera and tap “Delete Device.”
To reset, press and hold the camera’s reset button.
Follow the same steps to re-add it later.
Always reset before giving it to someone else.
FAQ: How to Install the Blink Outdoor Camera
Q1: Can I install Blink Outdoor Camera without Wi-Fi?
No, Wi-Fi is required for setup and use.
Q2: Can I use rechargeable batteries?
Blink recommends only lithium AA batteries for best performance.
Q3: How far can the camera be from the Sync Module?
Usually up to 100 feet indoors, depending on walls and interference.
Q4: Is Blink Outdoor Camera waterproof?
It’s weather-resistant, not waterproof. Avoid direct exposure to heavy rain.
Q5: Can I install it upside down?
Yes, and you can rotate the view in the app.
Q6: Can I view the camera feed remotely?
Yes, the Blink app lets you monitor it from anywhere.
Q7: What happens if the internet goes out?
The camera won’t record or notify you during outages.
Q8: Do I need a Sync Module for one camera?
Yes, the Sync Module is required even for a single Blink Outdoor Camera.
Q9: How often do I change batteries?
They typically last up to two years with average use.
Q10: Can I install multiple cameras?
Yes, you can add many cameras under one Sync Module.
Final Thoughts for how to install the blink outdoor camera
Installing the Blink Outdoor Camera is simple.
With this guide, you can finish it within 30 minutes.
Always position the camera smartly for full coverage.
Customize settings to match your home’s needs.
Now you know exactly how to install the Blink Outdoor Camera like a pro.