


To draw a gymnast, start with a basic stick figure to outline the pose. Add details and refine the figure for accuracy.
How to draw a gymnast requires understanding the human form and its movement. Begin by observing real gymnasts or reference images to capture their dynamic poses accurately. Use simple shapes and lines to outline the body, ensuring correct proportions and balance. Focus on the limbs’ positioning, as they convey the gymnast’s action.
Gradually add muscle definition, clothing, and facial features. Pay attention to the details of the hands and feet, as they often emphasize the gymnast’s grace and strength. Practice regularly to improve your skills and create more lifelike drawings. This method helps in producing accurate and lively illustrations of gymnasts.
Materials Needed
Drawing a gymnast can be a fun and rewarding experience. To get started, you need the right materials. Below, we will list the basic supplies and optional tools that will help you create a beautiful gymnast drawing.
Basic Supplies
First, gather all the basic supplies you need. These are essential for drawing a gymnast.
- Pencils: Use HB and 2B pencils for sketching.
- Eraser: A kneaded eraser is ideal for corrections.
- Paper: Choose a smooth drawing paper.
- Pencil Sharpener: Keep your pencils sharp.
- Ruler: Helps in drawing straight lines and measurements.
Optional Tools
These optional tools can enhance your drawing and make the process easier.
- Colored Pencils: Add color to your gymnast drawing.
- Blending Stumps: Smooth out pencil lines and shading.
- Fine Liners: Outline your drawing for a polished look.
- Lightbox: Trace and refine your sketches easily.
- Graphite Powder: Create soft shading and depth.
With these materials, you’re ready to start drawing your gymnast. Remember to have fun and be creative!
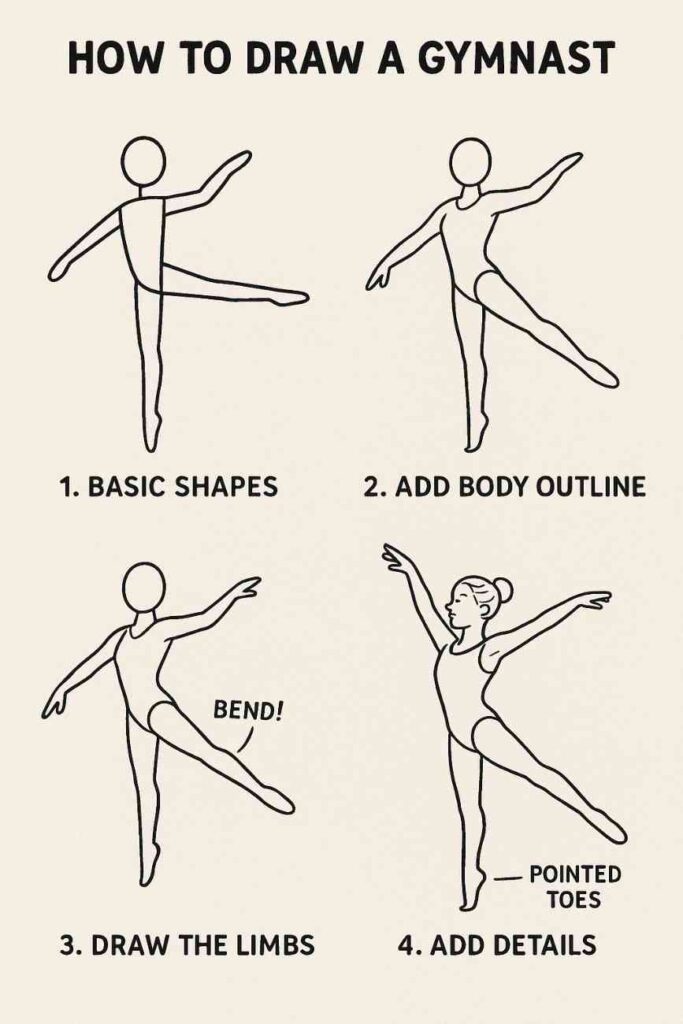
Here is a unique image depicting a step-by-step guide on how to draw a gymnast, designed for beginners. This illustration outlines the progression from basic shapes to a fully detailed figure in a dynamic gymnastic pose, complete with educational annotations to assist the drawing process.
Setting Up Your Workspace
Creating a suitable workspace is essential for drawing a gymnast. This helps you stay focused and organized. Let’s explore how to set up your workspace effectively.
Choosing A Quiet Spot
First, find a quiet place to draw. A quiet spot helps you concentrate better. Make sure the area is well-lit. Natural light is best, but a good desk lamp works too. Avoid spots with a lot of foot traffic. This reduces distractions and interruptions.
Organizing Your Tools
Next, gather all the tools you need for drawing. Here is a list of essential tools:
- Pencils – Different hardness for shading and outlines.
- Erasers – Regular and kneaded erasers for corrections.
- Paper – High-quality drawing paper.
- Ruler – For accurate measurements.
- Sharpener – Keep your pencils sharp.
Arrange these tools within arm’s reach. This saves time and keeps you in the flow. You can use a small table or desk organizer. Here’s a simple table to help you keep your tools in order:
| Tool | Purpose |
|---|---|
| Pencils | Shading and outlining |
| Erasers | Making corrections |
| Paper | Drawing surface |
| Ruler | Measurements |
| Sharpener | Maintaining pencil sharpness |
Finally, keep a cup of water or a snack nearby. This keeps you refreshed and focused. You’re now ready to start drawing your gymnast!
Understanding Proportions
Drawing a gymnast requires understanding the body’s proportions. This skill helps create realistic and dynamic poses. Proper proportions ensure the gymnast looks balanced and natural. Let’s explore the basics of human anatomy and some proportion techniques.
Human Anatomy Basics
The human body consists of various parts, each with specific sizes. Knowing these sizes helps you draw accurately. Here are some key points:
- The head is usually one-eighth of the total height.
- The torso is about three heads tall.
- Arms and legs have specific lengths relative to the torso.
Understanding these basics is essential. They form the foundation for realistic drawings.
Proportion Techniques
Several techniques help artists maintain proper proportions. Here are a few:
- Grid Method: Draw a grid over a reference image. Then replicate the grid on your paper. This method helps in scaling correctly.
- Head Count Method: Use the head as a unit of measurement. This helps keep the body parts in proportion.
- Gesture Drawing: Start with quick, rough sketches. This captures the movement and proportions before adding details.
These techniques help in achieving accurate and dynamic drawings. Practice them regularly to improve your skills.

Credit: www.youtube.com
Sketching The Basic Shape
Drawing a gymnast can be fun and simple. Start by sketching the basic shape. This will help you get the proportions right.
Drawing The Skeleton
The skeleton is the first step. Use light lines to draw it.
- Draw a vertical line for the spine.
- Add a small circle at the top for the head.
- Draw lines for the arms and legs. Make sure they are in the right positions.
These lines will guide you. They show the gymnast’s pose.
Adding Basic Shapes
Next, add basic shapes to the skeleton. This will give your gymnast some form.
| Body Part | Shape |
|---|---|
| Head | Circle |
| Torso | Rectangle |
| Arms and Legs | Ovals |
Use these shapes to outline the body. Keep your lines light and loose.
- Draw a circle for the head.
- Sketch a rectangle for the torso.
- Add ovals for the arms and legs.
Now, your gymnast has a basic shape. You are ready to add more details.
Detailing The Body
Drawing a gymnast requires attention to detail, especially when detailing the body. This part of your drawing brings the figure to life. You’ll need to focus on muscle definition and refining the limbs to make your gymnast look realistic.
Muscle Definition
Muscles play a big role in a gymnast’s body. To draw muscles, start with the major muscle groups. Notice the arm muscles, like the biceps and triceps. Sketch these muscles lightly first. Then, add more details as you go along. Use shading to show muscle tone. Look at references of gymnasts to see how muscles flex in different poses. This will help you get the details right.
Refining The Limbs
Limbs need special attention. Gymnasts have strong and flexible limbs. Start by sketching the basic shape of the arms and legs. Use simple lines and shapes. Then, refine these shapes to add details. Focus on the joints like elbows and knees. These parts bend and move a lot. Draw the joints with slight curves. This will make your gymnast look natural.
For the legs, notice the calf muscles and how they taper to the ankles. For the arms, pay attention to the forearm muscles. These details will make your drawing more accurate. Use light and dark lines to show depth. This will help the limbs look more three-dimensional.
Drawing The Face
In drawing a gymnast, the face is crucial. It reveals emotions and adds character. This guide will help you master the facial features and expressions.
Facial Features
Start with the basic shape of the head. Use a light pencil for sketching. Draw an oval shape for the face. Next, add guidelines to position the eyes, nose, and mouth.
FeaturePlacementEyesHalfway down the headNoseBetween the eyes and chinMouthOne-third below the nose
Draw the eyes as almond shapes. Add pupils and light reflections. The nose can be simple lines or detailed with nostrils. For the mouth, start with a simple curve. Add lips by drawing two lines above and below.
Expressions
Expressions make your gymnast come alive. Start with the eyebrows. Raised eyebrows can show surprise. Angled eyebrows can show determination.
- Happy: Curved-up eyebrows, wide-open eyes, and a big smile.
- Focused: Straight eyebrows, intense eyes, and a firm mouth.
- Surprised: Raised eyebrows, wide eyes, and an open mouth.
Use light and shadow to enhance expressions. Darken areas under the eyebrows. Add shadows to the sides of the nose. Shade under the lower lip for depth.
Adding Movement
To make your drawing of a gymnast come to life, you need to add movement. Movement gives your drawing energy and makes it look real. This section will guide you on how to capture motion and create dynamic poses.
Capturing Motion
Capturing motion is the first step in drawing a gymnast. Motion shows how the gymnast moves through space. Think about the flow of their body. Are they flipping, twisting, or balancing? Use light, quick lines to sketch the basic shape. This helps you see the overall motion.
- Start with a simple stick figure.
- Draw lines to show the direction of movement.
- Keep your lines loose and fluid.
Focus on the main action. For example, if the gymnast is flipping, your lines should show the curve of the flip. Avoid straight lines, as they make the drawing look stiff.
Dynamic Poses
Dynamic poses bring excitement to your drawing. These poses show strength and flexibility. A dynamic pose can make your gymnasts look like they are performing.
- Observe real gymnasts or photos for inspiration.
- Sketch the basic pose with simple shapes.
- Pay attention to the angles of the arms and legs.
Use curved lines for the limbs to show movement. Exaggerate the pose slightly to add more drama. For example, if the gymnast is leaping, draw the legs stretched out more.
| Tips | Details |
|---|---|
| Observe Real Gymnasts | Watch videos or look at photos to see how they move. |
| Use References | Refer to images to get the poses right. |
| Practice | Keep practicing to improve your skill. |
By following these steps, you can create a gymnast drawing full of life and motion.
Final Touches
Adding the final touches to your gymnast drawing can make it come to life. This step involves shading and highlighting to give it depth and realism.
Shading Techniques
Shading is crucial for adding dimension to your gymnast drawing. Use a pencil to add light and dark areas.
- Light Source: Determine where your light source is. This helps in deciding where to shade.
- Soft Shading: Use the side of your pencil for softer shading. This is useful for large areas like the gymnast’s body.
- Hard Shading: Use the tip of your pencil for darker, more defined shadows. This is perfect for areas under the arms and legs.
Highlighting
Highlights make your gymnast drawing look more realistic. They show where the light hits the gymnast.
- Eraser: Use a clean eraser to remove small areas of shading. This creates highlights.
- White Pencil: A white pencil can add highlights to darker areas. This works well for adding shine to the gymnast’s outfit.
Combining shading and highlighting will give your gymnast drawing a three-dimensional look.
Common Mistakes
Drawing a gymnast can be challenging. Many artists, both beginners and experienced, make common mistakes. These mistakes can make the drawing look less realistic. Let’s explore these errors and learn how to avoid them.
Proportion Errors
Proportions are crucial in drawing gymnasts. Incorrect proportions can make your gymnast look awkward. Here are some common proportion mistakes:
- Head Size: The head is often too large or too small.
- Arm Length: Arms may appear too long or too short.
- Leg Length: Legs may not match the body size.
Always check the proportions before finalizing your drawing. Use reference images to ensure accuracy.
Overcomplicating Details
Many artists add too many details. This can make the drawing look cluttered. Simplifying details helps maintain focus. Here are some tips:
- Start Simple: Begin with basic shapes.
- Add Gradually: Add details step by step.
- Focus on Key Elements: Highlight important features like the face and muscles.
Remember, less is sometimes more. Keep your drawing clean and focused.

Credit: www.pinterest.com
Frequently Asked Questions
How Do You Start Drawing A Gymnast?
Begin by sketching basic shapes to form the body. Use circles for joints and lines for limbs.
What Materials Do I Need To Draw A Gymnast?
You need a pencil, eraser, paper, and optional coloring tools like markers or colored pencils.
How Can I Make My Gymnast Drawing Look Realistic?
Focus on proportions and dynamic poses. Study gymnast photos for reference to capture accurate movements.
Can Beginners Draw A Gymnast Easily?
Yes, with practice and patience, beginners can draw a gymnast. Start with simple poses and gradually move to complex ones.
Conclusion
Creating a gymnast drawing can be fun and rewarding. Follow the steps and practice regularly to improve. Remember, patience and persistence are key. Share your artwork and enjoy the progress.
Happy drawing!
